From .bak to .bacpac: Managing Azure Migrations with Non-Standard Backups

Migrating a project to Azure can come with unexpected challenges, especially when dealing with non-standard backups like .bak files instead of the expected .bacpac format. In this blog post, we share how we navigated these obstacles, providing a step-by-step guide to overcoming Azure's limitations and ensuring a smooth transition for complex database migrations.

When it comes to cloud migrations, not every scenario plays by the book. Our recent migration of a Kentico project to Azure was supposed to be straightforward—until we were handed a .bak file instead of the expected .bacpac. This blog post unpacks the unique challenges we faced and provides a detailed walkthrough of our solution.

Note: You might wonder why we didn’t simply restore the database directly on our Azure server using SSMS (SQL Server Management Studio). It’s important to understand that Azure SQL Server does not support restoring from a .bak file directly. Instead, Azure requires the use of .bacpac files for database imports. This distinction is crucial for planning migrations and requires alternative strategies when traditional backups are not feasible.

Determining SQL Server Version from Backup Files Without Restoration

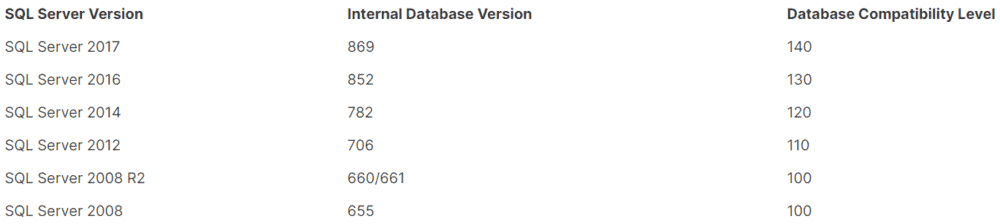
Before diving into the complexities of migration, it’s crucial to understand the environment we’re dealing with. One of the first hurdles we encountered involved identifying the SQL Server version of the .bak file provided, as mismatched versions between the source and target can complicate restorations.

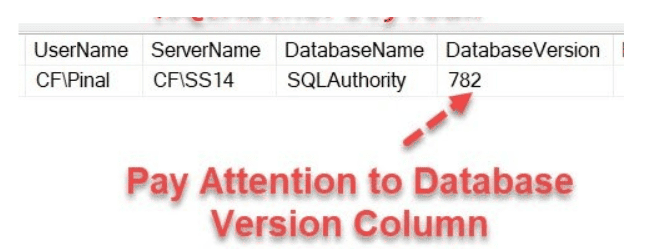
Typically, this information isn’t accessible without restoring the database, which can be time-consuming and resource-intensive. However, there’s a more efficient approach: using a SQL query to extract this information directly from the .bak file. By running the following SQL command, we can peek into the .bak file to retrieve essential details about the SQL Server environment without the need for a full restore:

				
					RESTORE HEADERONLY FROM DISK = 'C:\PathToYourBackup\YourBackupFile.bak'


Replace ‘C:\PathToYourBackup\YourBackupFile.bak’ with the actual path to your .bak file. This query provides a snapshot of the database’s metadata, including the version, which is instrumental in planning a smooth migration.

The image shows a table with four columns labeled "UserName," "ServerName," "DatabaseName," and "DatabaseVersion." The table has one row with the following data: UserName: CF\Pinal ServerName: CF\SS14 DatabaseName: SQLAuthority DatabaseVersion: 782 An arrow points to the "DatabaseVersion" value, with red text underneath stating "Pay Attention to Database Version Column."
The image displays a table with three columns: "SQL Server Version," "Internal Database Version," and "Database Compatibility Level." The data is as follows: SQL Server Version: SQL Server 2017 | Internal Database Version: 869 | Database Compatibility Level: 140 SQL Server Version: SQL Server 2016 | Internal Database Version: 852 | Database Compatibility Level: 130 SQL Server Version: SQL Server 2014 | Internal Database Version: 782 | Database Compatibility Level: 120 SQL Server Version: SQL Server 2012 | Internal Database Version: 706 | Database Compatibility Level: 110 SQL Server Version: SQL Server 2008 R2 | Internal Database Version: 660/661 | Database Compatibility Level: 100 SQL Server Version: SQL Server 2008 | Internal Database Version: 655 | Database Compatibility Level: 100

Restoring the Database from a .bak File

Once you have determined the SQL Server version of your .bak file, you may encounter scenarios where it is incompatible with all your available SQL Server versions. If this happens, consider the following options:

  1. Upgrade or Downgrade the SQL Server Version: If possible, install a compatible version of SQL Server temporarily to restore the .bak file. Once restored, you can then upgrade or downgrade the database to match your target environment before exporting it to a .bacpac file.

  2. Use a Third-Party Tool: Some third-party tools can convert .bak files to .bacpac or directly to Azure-compatible formats, potentially bypassing the version mismatch issue.

  3. Consult with Microsoft Support: If the backup file is crucial and none of the above options work, reaching out to Microsoft support may help, as they can offer advanced solutions or guidance specific to your scenario.

If your .bak file is compatible with your target SQL Server version, the next step is to restore the database. This process can seem daunting, but with the right commands and a careful approach, it can be executed smoothly. Here’s a step-by-step guide to help you restore your database from a .bak file:

  1. Prepare the Backup File Location: Ensure that the .bak file is stored in a location accessible by SSMS. This could be a local directory or a network location that the SQL Server can access.

  2. Verify SQL Server Availability: Before initiating the restoration, confirm that the SQL Server instance you intend to restore to is operational and accessible. It’s also crucial to verify that there is sufficient disk space available and that your account has the necessary permissions to perform restorations, to prevent any interruptions.

  3. Connect to SQL Server Using SSMS: Launch SSMS and connect to the desired SQL Server instance.

  4. Initiate the Restore Process: Navigate to the “Databases” section in the Object Explorer, right-click, and select “Restore Database.”

  5. Configure the Restore Source:
    • In the Restore Database window, set the ‘Source’ to ‘Device’.
The image shows part of a form with two radio button options labeled "Source." The first option is "Database," with a text field next to it (currently disabled or blank). The second option is "Device," which is selected, followed by an empty text field and a button with three dots ("...") to the right, likely for browsing or selecting a file or device path.
    • Click the ellipsis (…) to open the backup device selection dialog.
    • Set the ‘Backup media type’ to ‘File’, then click ‘Add’ to navigate to and select your .bak file.
  1. Begin the Restoration: Once the .bak file is selected and listed in the backup device dialog, click ‘OK’ to close the dialog, then again in the Restore Database window to start the restoration process.
  2. Monitor the Restoration: Wait for the import process to complete. You can monitor the progress directly within SSMS, which will display the status of the restoration.

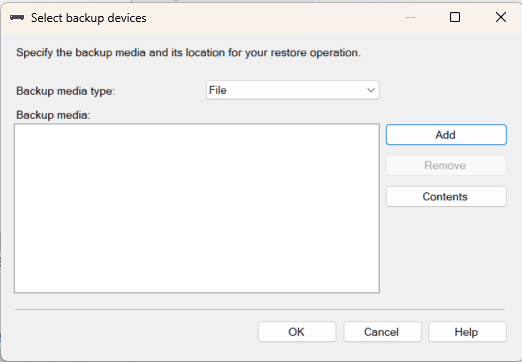
This process will transfer the data from the .bak file back into a live SQL Server environment, effectively recreating the original database structure and contents on your target server.

Handling Large Tables with BCP for Efficient Data Management

Due to the substantial size of certain tables within our database, a direct export to a .bacpac file was not feasible, as it would routinely cause timeouts. To circumvent this issue, we opted to individually extract these large tables using the Bulk Copy Program (bcp). This method allows us to offload the data efficiently and handle it separately, which is crucial for managing the database size during migration.

Important: Before proceeding with the BCP process, ensure that any foreign key constraints related to these large tables have been properly handled. Refer to the “Handling Foreign Key Constraints During Large Table Exports” section further in this article for detailed instructions on how to drop and reapply these constraints to avoid complications during the migration process.

For example, to export a large table, you can use the following bcp command in an administrative command shell:

				
					bcp dbo.YourTableName out "<YourFilePath>\<FileName>.dat" -d YourDatabaseName -n -T -S YourSQLServerInstance


Note: if Windows authentication isn’t an option for connecting to SQL Server, use:

				
					bcp YourTableName out "<YourFilePath>\<FileName>.dat" -d YourDatabaseName -S YourServerInstance -U YourUsername -P YourPassword -n


Replace dbo.YourTableName with the name of your large table, <YourFilePath>\<FileName>.dat with the path where you want to store the exported data, YourDatabaseName with the name of your database, and YourSQLServerInstance with your SQL Server instance name. By executing this command, the specified table’s data is exported into a .dat file, effectively reducing the load and complexity involved in the main database export process. This technique not only simplifies the handling of large datasets but also ensures that all parts of the database are backed up with integrity and are ready for a smooth transition.

Handling Foreign Key Constraints During Large Table Exports

When dealing with large tables that have foreign key constraints, there’s an additional step to consider. Since foreign keys enforce relationships between tables, they can complicate the export process, especially when using bcp or excluding these tables from the .bacpac file. Here’s how to manage this:

  1. Drop Foreign Key Constraints: Before exporting the tables separately, drop all foreign key constraints related to the tables. This step is crucial for successfully completing the .bacpac export.

  2. Document Constraints: Keep a detailed record of all constraints you drop, as you’ll need to reapply them after the data has been imported into Azure.

  3. Reapply Constraints Post-Migration: Once the data is fully imported into the Azure SQL Database, reapply the foreign key constraints to maintain data integrity.

In our case, we were fortunate that our large tables didn’t have any foreign key constraints, simplifying the process. However, this may not be the case for others, so it’s important to prepare for this scenario.

Excluding Large Tables During .bacpac Export

After handling the large tables with the bcp command, the next step in our migration process involves exporting the remainder of the database into a .bacpac file. This file format is ideal for Azure migrations but requires a careful approach when dealing with oversized data. Here’s how to efficiently exclude the large tables during the export:

  1. Open SQL Server Management Studio (SSMS): Connect to your SQL Server instance where the database resides that needs to be exported.
  2. Start the Export Data-tier Application Wizard:
    • Right-click on the database you want to export.
    • Navigate to ‘Tasks’ > ‘Export Data-tier Application…’.
    • This launches the wizard that guides you through the export process.
  3. Configure Export Settings:
    • In the wizard, select ‘Save to local disk’ to specify where the .bacpac file should be saved.
    • Proceed to the ‘Advanced’ settings where you can select specific database objects to export.
  4. Exclude Large Tables:
    • Within the ‘Advanced’ settings, you will find a list of all database objects.
    • Uncheck the tables you previously managed with bcp to exclude them from the .bacpac export.
  5. Review and Export:
    • Review your settings to ensure no large tables are included.
    • Click ‘Next’ to finalize the configurations and start the export.
    • Monitor the progress and wait for the export to complete successfully.
  6. Verify the .bacpac File:
    • Once the export is complete, it’s crucial to verify that the .bacpac file contains all necessary database objects except for the excluded tables.
    • This verification can be done by inspecting the .bacpac file or by attempting a test restore in a different environment.

By strategically excluding large tables during the .bacpac export, we ensure the file remains manageable and tailored for Azure migration. This approach minimizes potential timeouts and errors associated with large database sizes, streamlining the migration process to Azure.

Setting Up Your Azure SQL Database and Integrating Large Tables

Once the .bacpac file has been successfully exported without the oversized tables, the next phase involves setting up your Azure SQL Database and integrating the large tables you managed separately. This two-step process ensures that all components of your original database are accurately recreated in the Azure environment. Here’s how to complete this integration effectively:

Deploy the .bacpac to Azure SQL Server

To deploy your .bacpac file to Azure, follow these steps, which include creating a new SQL database directly from the .bacpac file:

  1. Log into the Azure Portal: Log into your Microsoft Azure portal, upload your .bacpac file to a storage account container if not already done, and then navigate to the SQL server where the database will be hosted.
  2. Start the Import Process:
    • From the SQL Server page, click on ‘Import database’ from the options available.
    • This action will prompt you to select the file you wish to import.
  3. Configure Your Database Settings:
    • During the import process, you will be asked to configure settings for the new database.
  4. Initiate the Import:
    • After setting up the configurations, initiate the import. Azure will create a new database based on the structures and data contained in the .bacpac file.
  5. Monitor the Import Status:
    • You can monitor the progress directly in the Azure portal. The time it takes to complete the import can vary depending on the size of the .bacpac file and the resources allocated to your SQL Server.

Integrate Large Tables

To deploy your .bacpac file to Azure, follow these steps, which include creating a new SQL database directly from the .bacpac file:

  1. Verify the Database Structure:
    • After the import is complete, connect to your new Azure SQL Server using SSMS.
    • Verify that the database is accessible, all structures and non-large data are intact, and that the database schema reflects the original, minus the excluded tables.
  2. Integrate the Large Tables:
    • Use the bcp command to import the data from the .dat files you created earlier for the large tables.
    • For each table, run a command like the following
				
					
bcp YourTableName in "<YourFilePath>\\<FileName>.dat" -d YourAzureDatabaseName -n -T -S YourAzureServer
				
			
    • Replace YourTableName, <YourFilePath>\<FileName>.dat, YourAzureDatabaseName, and YourAzureServer with your specific details.
  1. Validate the Data:
    • After importing the large tables, run some queries to ensure that the data is correctly aligned and integrated.
    • Check for any discrepancies or issues that might need addressing.
  2. Optimize and Tweak Settings:
    • Depending on the performance, you may need to adjust indexing or configure additional performance settings in Azure.
    • Monitor the database performance and make adjustments as necessary to optimize for your specific workload.

By carefully setting up the Azure SQL Database and methodically integrating the large tables, you can ensure a complete and functional migration that mirrors your original database environment. This meticulous approach not only secures data integrity but also enhances the overall performance and scalability of your database in the cloud.

Final Thoughts: Streamlining Site Migrations to Azure

In conclusion, migrating a project to Azure involves more than just transferring data; it requires strategic planning and careful execution, especially when dealing with large databases. By employing methods such as using bcp for large tables and efficiently managing .bacpac imports, we can overcome the limitations posed by traditional migration methods. The steps outlined in this guide not only simplify the process but also ensure that every component of the database is accurately recreated in the Azure environment, maintaining integrity and performance. As cloud technologies continue to evolve, so too do our approaches to optimizing these migrations, enabling businesses to leverage the full potential of cloud computing.

About the Author

Courtney Klawieter

Courtney is a web developer and chiropractor passionate about wellness and technology. She grew up in Rockford, Michigan, and attended Aquinas College for her undergraduate degree. After graduation, Courtney earned her doctorate from Palmer College of Chiropractic. Courtney transitioned from health care to website development because she felt an innate drive to challenge herself to learn new skills and wanted to help people regardless of location. In her free time, she enjoys rugby, rock climbing, hiking, fishing, hunting, and spending time with her dog.

Subscribe to Our Blog

Stay up to date on what BizStream is doing and keep in the loop on the latest in marketing & technology.